Wednesday, December 22, 2010
speaking of fabric flowers
How much do I love these fabric dahlia flowers?!?!?! The only problem is that they just look like a lot of work...I cant decide if they would be worth it or not....tempting, very tempting. Maybe after the holidays.
Will we ever make a flower headband?

So, for like the last three times I have visited home, my youngest sister and I have planned to make flower headbands....yet, the time always seems to go too fast and we never get a chance to do all we wanted to do (and since headband sewing seems to be one of our lower priorities, it always gets skipped). However, IF we ever do get around to it, I found this tutorial on brown paper packages. I totally big, fat {heart} ruffles so I think if I will add in some extra ruffles if we end up making them, but overall, I really like it. (and we could always use one of the nine billion flowers from the flower mother load)
Monday, December 20, 2010
Cute Christmas Creations
I found these snowman candy bar holders on conniescreativecorner

They look VERY easy. Here is the link for the FREE file to print up (dang...I guess I had better go buy come colored ink...please tell me I am not the only person who is endlessly out of printer ink...it's so dang expensive too!) and some a tutorial on how to put them together from Kerry's paper crafts
I also thought this gift card holder from stamping inspiration was cute.

Tuesday, December 14, 2010
Nativities
I wanted to do a link up to char's crap ive made nativity party so here are two pictures of our nativities. I LOVE her blog and I even know char personally (yes, I feel like I am almost a celebrity because of it. She was my trainer at work... way back in the day... when we used to do credit card collections together!)
Now I know, I certainly dont have any uber cool hand carved wood nativities straight from Jerusalem or anything like that, but I do have one unique thing about our nativities....we ALWAYS have more than three wise men. This tradition started when we first got married and bought our first nativity at Walmart. My husband was insistent that we had to find one that had "extra" pieces that matched so we could buy a fourth wise man (because you show me in the bible where it says there were only three wise man....cause it doesnt! :)
 So, even our little people nativity (which I highly suggest getting one if you dont have one already. They are THE BEST for kids) I had to seach ebay to find a fourth unique wise man!
 Here is the first one we got after getting married. Count closely on the right side and you will see what I mean!
Ornament Wreath
I made this ornament weath for my front a door a few weeks ago. I really liked how it turned out. About the only thing I dont like is that my husband has broken it TWICE. So, this is acutally the second wreath and I liked the way the first one turned out better. Oh well, hopefully this one will last through the holidays and then I plan to buy some new ornaments once they go on super-cheap after Christmas clearance and re-do it (since this one is currently being held together completey by hot glue!)


There are tons of tutorials out there on blogs about making them so I am not going to do a full tutorial. If you need ideas, I mainly used this tutorial on Eddie Ross. I also liked this one because it had links to several different wreaths so I could get ideas of what I liked (and what I didnt!)
Here are a few friendly tips that I found along the way. (and a few things I will do differently when I re-do it!)
1. If you are even remotely as clumsy as I am; use non-breakable ornaments.
2. That being said, dont use TOO cheap of ornaments (I got these at the dollar sections of target and while I loved that they were only a dollar a pack...I didnt love how how easily the tops broke when I was trying to smish {is that even a word} as many ornaments onto it....or when my husband dropped it.
3. When I do it again, I am plan to do it a little differently: if the ornament tops are all interchangeable, I plan to just string the ornament tops onto the hanger (without the ball being attached to it) at first and then put the balls on once they are all on so I can arrange them and move them around as needed (without having to unstring them all!). Just remember that when you attaching the balls to the ornament tops you have to use a dab of hot glue so they dont come apart.
4. Used ribbon that isnt sheer (I used sheer ribbon and it was pain trying to make sure it didnt show the clothes hanger underneath.
5. SAVE A WIRE HANGER! Man, I didnt realize how much I followed Joan Crawfords advice (you know, "NO MORE WIRE HANGERS" from Mommy Dearest) until I tried to find a wire hanger.
So, I cant wait to see if anyone else makes one and what they find out!
Saturday, November 13, 2010
The flower motherload...
My sister found this link which shows 40 differentways to make flowers on Oopsey Daisy.Yes, you read that right, 40!.......AND...... then she lost it!
But, luckily she found it again, so, in an attempt for us to NEVER be left without a flower tutorial whenwe need one, I have added it here at her request. I LOVE the ideas too.
I think I feel a sister craft night coming on the next time I visit home......THANKS SISTA!
But, luckily she found it again, so, in an attempt for us to NEVER be left without a flower tutorial whenwe need one, I have added it here at her request. I LOVE the ideas too.
I think I feel a sister craft night coming on the next time I visit home......THANKS SISTA!
Monday, November 8, 2010

Sunday, November 7, 2010
Monday, November 1, 2010
Petti- TUTU
After coming going thru about 10 different TUTU tutorials and not really liking any of them I combined a little of all of them all into one that I finally like. I would change a couple of things if I had to do it over again but overall I like the way it turned out.. Whadda think??

I didnt do a tutorial on it because I didnt take pictures along the way (and I was truthfully totally making it up as I went along) but if anyone is interested in how I did let me know and I will see if I can put some type of semi-intelligent instructions together)

I didnt do a tutorial on it because I didnt take pictures along the way (and I was truthfully totally making it up as I went along) but if anyone is interested in how I did let me know and I will see if I can put some type of semi-intelligent instructions together)
Halloween Dorks

I will readily admit that I am a Halloween dork!
Last week when I was the fabric store getting stuff for the halloween costumes I saw that they had CUTE Halloween fabric 75% off..... AND when I remembered that Halloween was on Sunday this year...... AND when I remembered this post, I decided I HAD to get some cute halloween fabric and make some skirts for my girls.
So, when I should have been sewing halloween costumes, I was sewing skirts instead. They turned out super cute and they got to wear them several times.
AND, the day before Halloween, I saw that there was enough fabric left over for one more skirt, I decided to make one more for myself...Yes, I love Halloween and I am a HALLOWEEN DORK!


Strip Skirts
If you also want to be a Halloween (or Christmas or Valentines Day or Fourth of July, etc) dork too...here is the dimensions for the skirts. I purchased 1/2 yard of 5 different prints plus 1/2 yard plain black fabric for top and two packages of black double fold wide bias tape (quilt size). This gave me enough for 3 skirts.
For the size 6 skirt I used a total of 15 strips 5" x 14" sewn together with 5/8" seams and two black rectangles 14" x 4" for the top.
For the size 3 skirt I used a total of 15 strips 4.25" x 11"sewn together with 1/2" seams and two black rectangles 13" x 3.5" for the top.

Sew together the two rectagles for the waistband with right sides together. Form a casing in the top for the elastic by turning under twice and stitching (leave and opening to thread the elastic thru). Slightly gather the top of your strips and adjust till it's the same length as the waistband. Sew the waistband and the strips with right sides together. Thread your elastic and adjust it to fit the waist size you need. Sew the elastic together and close the opening in the casing.
For the size 6 skirt I used a total of 15 strips 5" x 14" sewn together with 5/8" seams and two black rectangles 14" x 4" for the top.
For the size 3 skirt I used a total of 15 strips 4.25" x 11"sewn together with 1/2" seams and two black rectangles 13" x 3.5" for the top.
Start by sewing all the strip together in the order you want. Sew the first and last strip together as well so it ends up being a tube.

Sew together the two rectagles for the waistband with right sides together. Form a casing in the top for the elastic by turning under twice and stitching (leave and opening to thread the elastic thru). Slightly gather the top of your strips and adjust till it's the same length as the waistband. Sew the waistband and the strips with right sides together. Thread your elastic and adjust it to fit the waist size you need. Sew the elastic together and close the opening in the casing.
And VOILA...you are a halloween dork!!! :)
Wednesday, October 13, 2010
PHOTO OP!
Next time I visit Utah I am TOTALLY going to some family pictures against a bright yellow wall!!! (thanks Jamie for sharing the link!) If anyone else wants to find a yellow (or blue, or checkered) here is a list of fun ones in Utah.
http://studio5.ksl.com/index.php?nid=71&sid=12534368
http://studio5.ksl.com/index.php?nid=71&sid=12534368
Monday, October 11, 2010
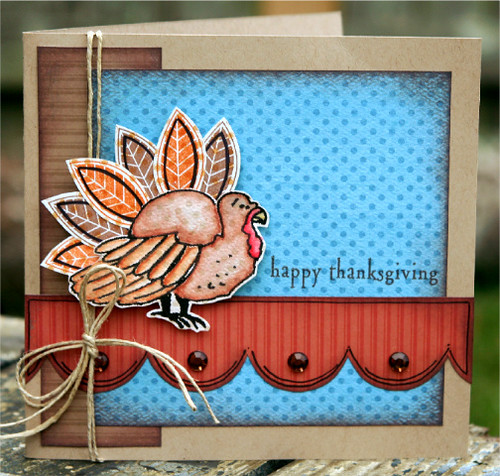
Handmade Card Idea Blogs
http://www.crystalkbk.blogspot.com/
http://stampinwithjulie.blogspot.com/2010/10/harvest-blessings.html
http://corgi-creations.blogspot.com/2010/10/mojo-monday-159-and-scs-sketch-300.html
http://stampinwithjulie.blogspot.com/2010/10/harvest-blessings.html
http://corgi-creations.blogspot.com/2010/10/mojo-monday-159-and-scs-sketch-300.html
Monday, September 27, 2010
Some Halloween Crafts (plus extras!)
 http://craftysisters-nc.blogspot.com/2010/09/trickor-treat-topiaries.html
http://craftychicmommy.blogspot.com/2010/09/wooden-pumpkins.html
http://apumpkinandaprincess.blogspot.com/2010/09/halloween-candy-jar.html
http://pittypatpaperie.blogspot.com/2010/09/altered-paper-bag.html
http://craftily-ever-after.blogspot.com/2010/09/damask-mod-podge-frame.html
http://nancyscouture.blogspot.com/2010/09/booster-seat.html
http://michellelunt.blogspot.com/2010/09/spooktacular-halloween-porch-decor.html
http://thecraftymamablog.blogspot.com/2010/09/trendy-clothes-pins.html
http://apumpkinandaprincess.blogspot.com/2010/09/halloween-candy-jar.html
http://christyrobbins.blogspot.com/2010/09/arrrrr-pirate-tutu-costume.html
http://apumpkinandaprincess.blogspot.com/2010/09/halloween-candy-jar.html
http://pittypatpaperie.blogspot.com/2010/09/altered-paper-bag.html
http://craftily-ever-after.blogspot.com/2010/09/damask-mod-podge-frame.html
http://nancyscouture.blogspot.com/2010/09/booster-seat.html
http://michellelunt.blogspot.com/2010/09/spooktacular-halloween-porch-decor.html
http://thecraftymamablog.blogspot.com/2010/09/trendy-clothes-pins.html
http://apumpkinandaprincess.blogspot.com/2010/09/halloween-candy-jar.html
http://christyrobbins.blogspot.com/2010/09/arrrrr-pirate-tutu-costume.html
Wednesday, September 22, 2010
Oopsey...I did it again

Crap! I found another blog I really like. Too bad I already spend too much time as it is looking at craft blogs. Oh well! If you are unlike me and have lots of free time on your hands, take a look at http://oopsey-daisy.blogspot.com/ I especially like the quiet book and I-spy bags
Sunday, September 19, 2010
Someday
 On my personal blog a while ago I made a "someday" list...it was list of all the things I would like to have "someday" (AKA when the hubs finishes the never ending school program he is on now). One of those things was to have no more particle board furniture in my house...wouldn't that be grand?!?!??
However, now in the fabulous world of craft blogs, I found a blogger who has plan for all the amazing things from places like pottery barn that you can build yourself! Isn't that a great idea?!?! Yes, you are saying, except for the fact that then you have to build them yourself (or try to get your husband, who has absolutely no time on his hands to do it for you)! I know, Iknow, neither of those options sounds that great. However, my friend had the fabulous idea to use those plans and then HIRE someone (off of craigslist) to build them for her....BEST OF BOTH WORLDS! You get good, beautiful (PB) quality furniture for the cost of particle board (Walmart) crap.
Check it out here: http://ana-white.com/ but be sure to have enough time to waste a bunch while looking it over!
Oh, and just as an FYI...the picture is not from her site...its from just between friends. I am considering re-doing the girls room before we move (the hubs doesn't love the "pepto" color, as he calls it, on their walls) to be more like this room and I thought those shelves would be great next to their bed...heck, maybe I will just have a whole new bed made for them from one of ana's patterns while I am at it! Maybe one like this or this or even this:

(ana even has some patterns for even cuter shelves here )
Saturday, September 18, 2010
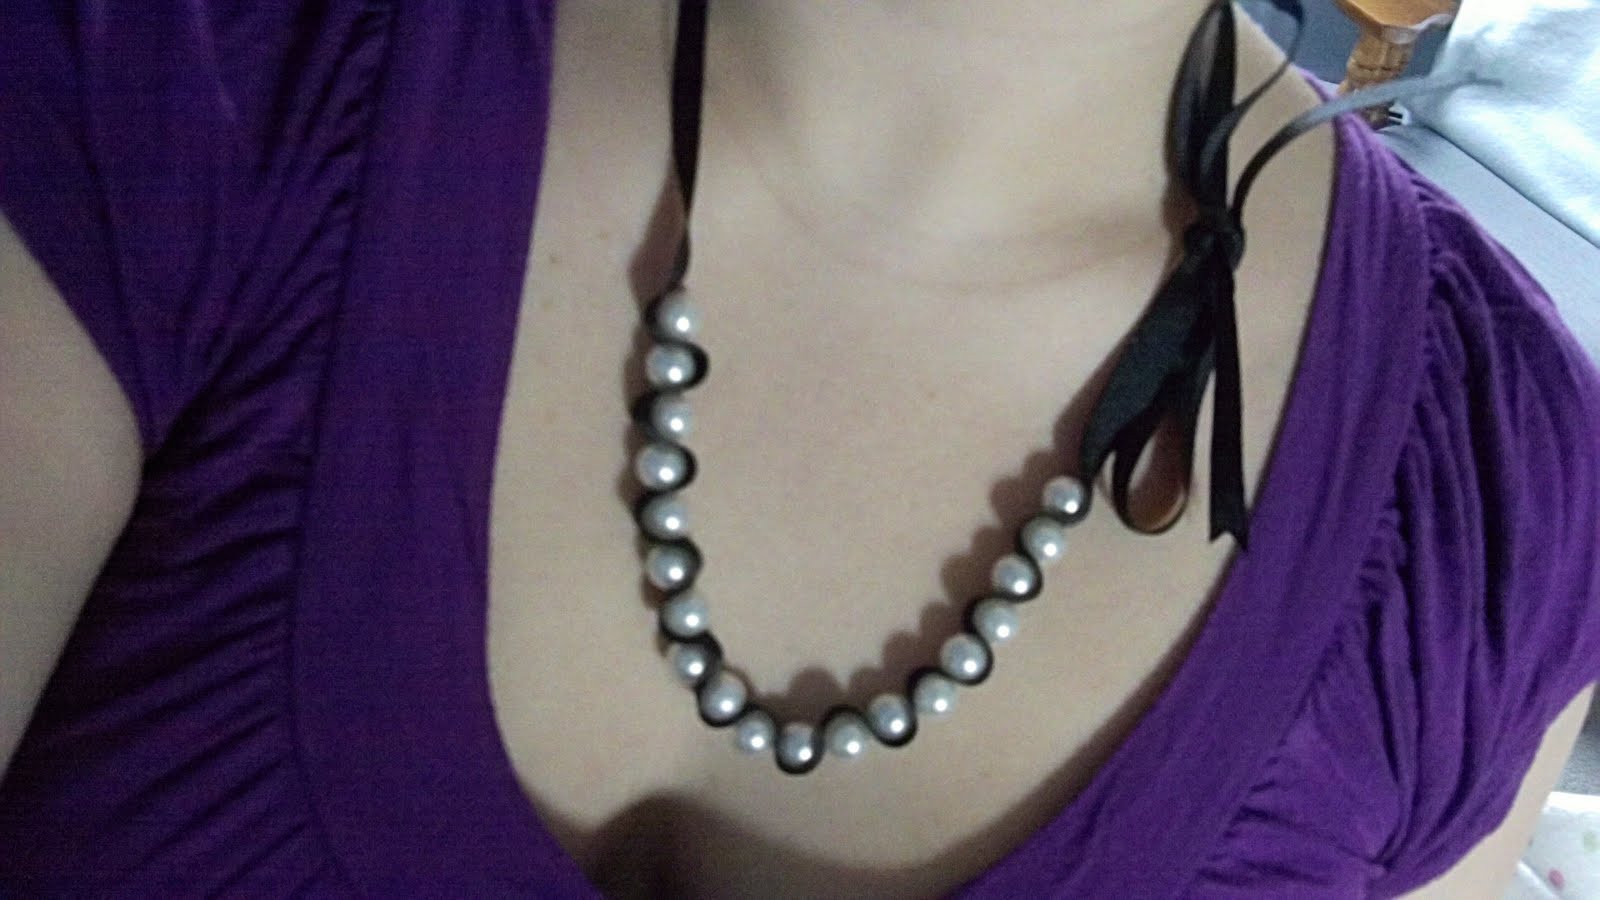
I found a cute ribbon necklace tute here. I may have to try it (since I still have beads left over from the whole interchangeable watch phase I went through a few months ago!
Tuesday, August 31, 2010
Guest Blogger
 Ok...so I lied...there really is no guest blogger...this really is just ME, but, my sweet friend Tausha showed me this link so I am kinda counting this as her guest blogging.
 These are just canvases pained with a base coat and then COOKIE CUTTERS....how awesome is that???
See the full instructions here:
http://kimboscrafts.blogspot.com/2010/05/in-case-you-missed-it.html
Bento-ver
 I think Bento lunches are kinda ridiculous. I think anyone who has time to cut cheese and sandwhiches into little bunnies or flowes has WAY too much time on their hands (and I think kids need to learn to eat healthy foods no matter what they look like) However, I do love to send notes to my kids and I came across this cute printout on a blog about bento lunches.
http://www.mariahdemarco.com/wp-content/uploads/downloads/2010/08/Lunch-Notes.pdf
Thursday, August 26, 2010


Friday, August 20, 2010
CUTE, CHEAP, and EASY
 No, that is not a description of myself in High School (I would never call myself cute!)
 It's these super cute oreo cookie suckers. These will be perfect for the upcoming school bake sale...I LOVE things that are easy to make but look really special!!!
OREO COOKIE SUCKERS
OREO COOKIE SUCKERS
Speaking of easy things that end up looking cute HERE is the easiest, cutest heart shaped brownies w/sprinkles ever (why do sprinkles make everything better???) I made these last year for a Valentine's party at church and they were a total hit.
Friday, August 6, 2010
Thursday, August 5, 2010
ELMO CARD
My three-year-old loves elmo. She would love this card and it looks so easy and cute. I think I may have to get this mag.

Tuesday, August 3, 2010
So Many Cute Cake Ideas....so little time
I love all the ideas for these fun cakes. My favorites were probably this purse cake (which if you do an image search for purse cakes you will find TONS of cute cakes btw) and the wii cake and the tuxedo cake. Too bad I dont have any reasons to make cakes any time soon!
42 Stunning Cakes in 10 Ingredients and Less - Parenting.com
Saturday, July 17, 2010
Scrapbooking Ideas
I do a scrapbooking swap with some ladies from my church and although we took a hiatus for the summer, I am still looking for ideas. LOVE the row of buttons on this one from ck
Wednesday, June 30, 2010
5 min jello recipe
I came across this recicpe on a blog recently(http://visitingteachingblog.blogspot.com/2010/06/jello-surprise.html) and I immediately liked it because it is so quick! :) I put my own twist to it and here is it is:
5 minute jello salad
1 lg package jello
1 1/3 c boiling water
16-18 ice cubes
4 c whipped topping (divided)
Fresh fruit (optional)
Put jello and water into a blender. Blend on high for 1-2 minutes. Add ice cubes to blender one at a time while continuing to blend till completely mixed. Mix in 2 cups whipped topping. Immediately pour into serving bowl and cool in refrigerator for 5 minutes. Add fresh fruit, and another dollop of cream on top, if desired.
Optional: This can be made into a layer salad by dividing mixture into half after blending. Add whipped topping to only one half. Layer the half with the whipped topping on top of the half without. Fresh fruit can be added to either layer or on top, if desired. Top with remaining whipped topping.
Thursday, June 24, 2010
Marshmallow Gun
I think I am going to have to try to make one of these for my boys!
http://www.theidearoom.net/2009/05/make-miniature-marshmallow-gun.html
http://www.theidearoom.net/2009/05/make-miniature-marshmallow-gun.html
Monday, May 24, 2010
How cool is this?

My friend (and fellow boot-camper) does the most amazing photo artwork using letter. She is doing a giveaway on real moms real reviews. Check it out here
Wednesday, May 12, 2010
I feel like I am getting in a hair style rut again with my girls, sooo that meant it was time to do a little blog hopping looking for new ideas. Here are few of the ones I want to try:
Loopy DO
Standard Bow
Two for One
Cross Messy Bun (done this one before and liked it)
Double Twist
And the following posts from It's a Girl Thing (I coudn't figure out to link theses so since this just for my info to help me remember which ones I wanted to try and not have to go searching all over blogs, this works, right?)
September 4, 2009
June 29, 2009
June 26, 2009
June 16, 2009
Feb 3, 2009
May 8, 2009 (minus the tiara)
And that one that I was looking for that started this whole search: February 22, 2010!
Monday, May 10, 2010
Marshmallo Fondant Barney the Dinosaur Cake

This is my first attempt at fondant and I think it went pretty well. Since my daughter ONLY wanted a Barney cake I had to try to figure out a way to make one all on my own (I tried to get her to go for Elmo or Dora or ANYTHING else that has been popular in this Millennium so I would be able to buy something to use for the cake, but it HAD to be Barney). I used this recipe of off all recipes.com and also got tips off of the cake stylist and whats cooking America. After I made it and kneaded it, I put it in a plastic bag and put in the fridge until I was ready to use it later that day. I started with a cooled 13x9 cake that I leveled and then frosted with white frosting (from a can) and then put in the freezer to help it set and prevent crumbs (it was a chocolate cake...that is what she wanted). After freezing, I frosted it again to make smooth (I dipped the knife in a cup of milk while frosting which helped smooth it out). Then I tinted the fondant (which ended up with a entire bottle of red food coloring on the carpet, but that is a whole 'nother story) and then rolled it out. I used a picture of Barney that I printed off of a coloring page website and enlarged it and cut it out and used it as guide to cut out the fondant (be careful to not let the paper stick to the fondant). It was a little bit difficult to get it to transfer onto the cake (I finally just rolled out the fondant onto tip foil sprayed with Pam and then turned it upside and tried to get it off onto the cake...I am not sure if this is a very "proper" fondant technique but it worked!) Then I just cut another piece of green fondant for his stomach and rolled small yellow fondant balls for his toenails. I did decorate the other parts of barney with regular black icing from a can. I also cut out circles from the leftover fondant to decorate it and my older two children rolled out some small fondant balls to put around the bottom. In the end, it was a hit!
Tuesday, April 20, 2010
Interchangeable Watches
As I stated in the post below, I have been wanting to make those interchangeable watches. So, I decided I would just jump right in and figure it out. It turned out that they were not hard AT ALL (and yet they cost SO much to order them on-line...I thought about just ordering some but since they turned out to be so easy, I am glad I didn't waste my money).
And now, I am now officially ADDICTED to beading watches. In fact, when I brought home a big bag of beads from hobby lobby the other day, my hubbie asked, "what's that?"(he is always leery of extra junk in the house). "My new thing" I replied. To which he replied "what about the 20 old things in the basement you still need to finish?"(He is such a cynic...so what if I may have a few wooden blocks that need painting and piles of fabric that need to made into adorable matching skirts and vinyl lettering waiting to find just the right wall and more scrapbook paper than I could ever count! :)
Oh well, for now, I am a beading fool (in fact, I am getting together with a couple pf girl friends tomorrow to make more. YAY! I will try to post a full tutorial after we are done)

Here is a few of the different bands we made
 Here is a close up of one. This shows the lobster claw that are used to attach the band to the watch face.
 A few different watch faces I ordered. You need to order the ribbon faces for this project.
 I ordered my watches from this website and I really liked their selections:
http://www.thevirtualtouch.com/
This site did have more inexpensive watch faces however if you want to try to stay on a budget but still get cute faces:
http://www.firemountaingems.com/search.asp?skw=watch+faces&Constraint=1u&Shop_Page=1&x=0&y=
And, if you want to start immediately (and I cant blame you if you do) there is a tutorial already on here that I used to make mine: http://itssoverycheri.blogspot.com/2009/11/give-way-watch-tutorial-frugile.html
SEW DANG CUTE

I saw these super cute playhouses on Etsy (http://www.etsy.com/shop/missprettypretty) and I now WANT to make one for my girls. They are made of fabric and fit over a card table so you can fold it all up when they are done playing...LOVE IT!!!! She does sell the patter for them on Etsy so now all I have to do is decide whether I want to order the patter or try to come up with the ideas on my own. Either way....I think I feel a trip to the fabric store coming on!
Some ideas:
http://craftychicmommy.blogspot.com/2010/03/felt-play-house.html
http://firefliesandjellybeans.blogspot.com/search/label/Felt%20House%20Along
http://homemadebyjill.blogspot.com/2009/10/felt-playhouse.html
http://angieasplund.blogspot.com/2008/12/card-table-playhouse.html
http://sewmuchado.blogspot.com/2009/02/card-table-playhouse-tutorialette.html
http://www.craftster.org/forum/index.php?topic=331509.0
http://makeitandloveit.blogspot.com/2009/02/fort-table-cover.html
http://ikatbag.blogspot.com/2009/05/princess-pavillion-tent.html
http://melissagoodsell.typepad.com/day_to_day/2007/09/fabric-cubby-ho.html
Sunday, April 4, 2010
Resurrection Easter Rolls
I found this recipe online so I decided to try it this year for Easter morning. It was just me and the kids I home since Daddy had to work, so, I figured this would be a good way to try to bring in the true meaning of Easter (and have a fun time with my kids at the same time.) Overall, it went well, there was some extra marshmallow goo on the pan (thank goodness for pampered chef stoneware and it's non-stick surface) so next time I may cut the marshmallow in half first.
Resurrection Easter Rolls:
Preheat Oven to 350 degrees
Ingredients:
Crescent rolls
Melted butter
Large marshmallows
Cinnamon
Sugar
Give each child a triangle of crescent rolls. The crescent roll represents the cloth that Jesus was wrapped in.
Read Matthew 27:57-61
1. Give each child a marshmallow. This represents Jesus.
2. Have him/her dip the marshmallow in melted butter. This represents the oils of embalming.
3. Now dip the buttered marshmallow in the cinnamon and sugar which represents the spices used to anoint the body.
4. Then wrap up the coated marshmallow tightly in the crescent roll (not like a typical crescent roll up, but bring the sides up and seal the marshmallow inside.) This represents the wrapping of Jesus' body after death.
5. Place in a 350 degree oven for 10-12 minutes. (The oven represents the tomb - pretend like it was three days!)
6. Let the rolls cool slightly. The children can open their rolls (cloth) and discover that Jesus is no longer there, HE IS RISEN!!!! (The marshmallow melts and the crescent roll is puffed up, but empty.)
Now read Matthew 28:5-8
Monday, March 29, 2010
Interchangeable Watches
I want to try to make one of these interchangeable watches. A lot of my friends are wearing them now but so far the price has seem a little high to me. I found this tutorial however and it looks SO easy I am definelty going to try. I put in my order for watch faces and now I need to find just the right beads! (If this works out well I may end up giving these out to EVERYONE I know so be sure to pretend to be suprised if you get one.
Ideas:
http://itssoverycheri.blogspot.com/2009/11/give-way-watch-tutorial-frugile.html
http://bejewledbeads.blogspot.com/
http://www.chunkyblink.com/
Ideas:
http://itssoverycheri.blogspot.com/2009/11/give-way-watch-tutorial-frugile.html
http://bejewledbeads.blogspot.com/
http://www.chunkyblink.com/
Tuesday, March 16, 2010
Easy Carmel Popcorn
I got this recipe from my friend Natalie. I made a few small changes but over-all it's her recipe. It is SO easy but tastes as good as carmel popcorn that takes a long time (and a candy thermometer) to make! I have even done it in the microwave before. We love making this for holiday neighbor gifts by adding in holiday candies (Candy corn, Christmas m&m's, etc)
Ingredients
1 stick butter or margarine
1 C packed brown sugar (optional)
25 marshmallows (the S'mores size, not miniature)
Two bags microwave popcorn, popped
Directions:
Melt butter, sugar and marshmallows on stove top, stirring constantly, til all the marshmallows are dissolved and it becomes creamy( It gets stringy if you cook it too long) Poor over bags of popped microwave popcorn and stir till coated. Tip: use your hands to scoop the popcorn into the bowl- leaving the unpopped kernels in the bottom of the bag and out of the caramel.
Sunday, March 14, 2010
Chicken Taco Soup
This is one of my favorite recipes because it is SO quick and easy. I make it when I need something fast for a potluck or when I need to take dinner to someone. Whenever I make it, people often ask for the recipe so I thought I would share it here.....The only problem is that it is SO easy that I almost don't want people to know how easy it is!
It's a basic taco soup recipe (that I got from my sister, Jamie) but I switched it up just a little by using chicken instead of hamburger ( I LOVE it with chicken). I usually poach chicken breasts in a little bit of water and then cut them into bite sized pieces.
Taco Soup:
1 can diced or crushed tomatoes, undrained
1 can corn, undrained
1 can kidney beans, drained
1 pkg taco seasoning
1 lb cooked chicken, cut into bite sized pieces or 1 lb hambuger, browned and drained
Combine and cook till heated through. Serve and top with grated cheese, sour cream, tortilla chips and/or salsa.
Thursday, March 11, 2010
Stuff I want to make (I just need more time to do it!)
I am putting a whole list of links along the side of things I want to make. I see SO many fun things of different blogs and then when I want to make them, I have completely forgotten where I saw them. So this is my solution. Hopefully, this will help me to stay a little more organized and waste a little less time seaching, and searching, and SEARCHING!
Monday, February 15, 2010
School Valentine's Party Idea
 Here is a an idea for a school Valentine's box that turned out really well and was able to be completed in one night. We did a SpongeBob box (since he is already "Box" shaped"). We got a USPS Flat rate shipping box (medium size...they give them away free at the post office) then cut a hole in the top (for the valentines to go in) and covered the top with yellow scrapbook paper (12X12 size works well) and the bottom with brown and then got white strips w/ a random wave to them for the shirt. We did an image search on-line and then printed out the eyes and mouth and then cut them out and glued them off (this made SUCH a difference on how it turned out looking, to have the eyes and mouth "just right" made the whole thing perfect). We colored circles for the sponge holes w/ a yellow-green crayon and we glued on a red tie shape and outlined anything needed w/ a black sharpie. It was super-easy and it ended up WINNING first place in the class valentine's box contest.
I also wanted to share a few ideas for the school Valentine's party. This was a for a third grade class so it would need to be adjusted for younger or older students. We played a conversation heart relay race. We divided the kids into two lines and then me and the teacher each held a mirror and bowl of conversation hears. Then the kids had to come up, one-by-one, and try to fill up a cup that they held on their head w. the conversations hearts by looking the mirror. Then we quieted things down a little with a game of "honey, if you love me, give me a smile" and then finished off the party with a game of pictionary using Valentine words while they ate their snack. The kids seemed to really have fun and the teacher mentioned several times how well the party went.
Thursday, February 11, 2010
Nursing Cover Tutorial
These are step-by-step instructions for making a nursing cover (similar to a "hooter hider" or an "udder cover.")
Supplies:22 X 45 inch rectangle of fabric (pre-washed)
1 pkg extra wide, double fold bias tape
1/2 yard of boning
small strip of velcro
Step one: put on a Barney DVD (this is "step one" of all my projects)
Step two: Trim a 5 inch strip off of each of the short ends of the fabric (this should leave you with two rectangles, each 5 X 22 inches, in addition to your larger rectangle.) One of these smaller rectangles will become your strap. (the other is "extra." I use it to cover a travel wipe holder...I will maybe a put a pic of one of those on my blog too when I get a chance) To make the strap, fold the rectangle (right sides together) lengthwise and then sew with 1/2 seam along the long end and one of the shorter ends. Turn right side out.
 Step Three: Round all the corners of the larger rectangle (I use a dinner plate as a guide)
 Step Four: Starting toward the end of one of the longer sides, sew the bias tape around the large rectangle. (I like to first make sure the bias tape will be long enough to sew all the way around. It should be enough but sometimes it is close so I like to check and trim a little off of my fabric as necessary.) Sew very close to the inner edge of the bias tape but make sure to catch all the layers of the fabric and bias tape. Stop sewing when you are ALMOST back to where you started from. Leave a small opening to thread the boning through.
 Step Five: Sew Across the ends of the boning so the inner plastic part cannot come out (slightly trim inner plastic section as needed) (just to clarify...this is not shown in the picture above. the picture above is still for the previous step)
 Step Six: Thread the entire boning into the bias tape, along the long edge, through the small gap that was left between the beginning and ending of the bias tape (this is why you needed to sew close to the edge of the bias, so the boning can fit). Boning normally has a natural curve to it so make sure it curves toward the right side of the fabric (this leaves a little window which the mother can see down thru to the baby when it's all completed.) Center the boning so it's the middle of the top long edge (inside the bias tape). Finish stitching the bias tape to the end, folding under the raw edge
 Step Six: Attach strap. Before attaching, measure to desired length and trip off excess of raw edge (I usually take about 5 inches off). Attach strap by turning under raw edge and stitching to the backside (along the top of bottom of bias). Match the outside of the strap with the outer end of the boning. Stitch across outside edge of boning (through all layers of bias and fabric) several times in order to make it strong and not allow the boning to slide. (FYI...I have broken needles before so I DONT Sew directly over the boning. Instead I stitch along the top and bottom of it and very close to the outside edge which prevents it from sliding)
 Step Six: Cut small length of velcro to width of strap and sew one section to the other end of the strap. Then sew the other section of velcro on the backside of the fabric in a similar manner as above, matching the outer edge of the velcro to the outer of the boning. Sew across the end of boning several times again to keep it from sliding on this side.
Well, I think that is everything. See the top picture for the finished product. Let me know if you try to make it and my directions are clear. This is my first time so I am sure I left some parts out, but hopefully you can decipher it!
 And, that it! Now you can discreetly nurse you baby in public without flashing everyone (or if you are like me, no one can tuck around the side of you so no one case see your back fat either!)
Supplies:22 X 45 inch rectangle of fabric (pre-washed)
1 pkg extra wide, double fold bias tape
1/2 yard of boning
small strip of velcro
Step one: put on a Barney DVD (this is "step one" of all my projects)
Step two: Trim a 5 inch strip off of each of the short ends of the fabric (this should leave you with two rectangles, each 5 X 22 inches, in addition to your larger rectangle.) One of these smaller rectangles will become your strap. (the other is "extra." I use it to cover a travel wipe holder...I will maybe a put a pic of one of those on my blog too when I get a chance) To make the strap, fold the rectangle (right sides together) lengthwise and then sew with 1/2 seam along the long end and one of the shorter ends. Turn right side out.
Step Three: Round all the corners of the larger rectangle (I use a dinner plate as a guide) Step Four: Starting toward the end of one of the longer sides, sew the bias tape around the large rectangle. (I like to first make sure the bias tape will be long enough to sew all the way around. It should be enough but sometimes it is close so I like to check and trim a little off of my fabric as necessary.) Sew very close to the inner edge of the bias tape but make sure to catch all the layers of the fabric and bias tape. Stop sewing when you are ALMOST back to where you started from. Leave a small opening to thread the boning through. Step Five: Sew Across the ends of the boning so the inner plastic part cannot come out (slightly trim inner plastic section as needed) (just to clarify...this is not shown in the picture above. the picture above is still for the previous step) Step Six: Thread the entire boning into the bias tape, along the long edge, through the small gap that was left between the beginning and ending of the bias tape (this is why you needed to sew close to the edge of the bias, so the boning can fit). Boning normally has a natural curve to it so make sure it curves toward the right side of the fabric (this leaves a little window which the mother can see down thru to the baby when it's all completed.) Center the boning so it's the middle of the top long edge (inside the bias tape). Finish stitching the bias tape to the end, folding under the raw edge Step Six: Attach strap. Before attaching, measure to desired length and trip off excess of raw edge (I usually take about 5 inches off). Attach strap by turning under raw edge and stitching to the backside (along the top of bottom of bias). Match the outside of the strap with the outer end of the boning. Stitch across outside edge of boning (through all layers of bias and fabric) several times in order to make it strong and not allow the boning to slide. (FYI...I have broken needles before so I DONT Sew directly over the boning. Instead I stitch along the top and bottom of it and very close to the outside edge which prevents it from sliding) Step Six: Cut small length of velcro to width of strap and sew one section to the other end of the strap. Then sew the other section of velcro on the backside of the fabric in a similar manner as above, matching the outer edge of the velcro to the outer of the boning. Sew across the end of boning several times again to keep it from sliding on this side.Well, I think that is everything. See the top picture for the finished product. Let me know if you try to make it and my directions are clear. This is my first time so I am sure I left some parts out, but hopefully you can decipher it!
And, that it! Now you can discreetly nurse you baby in public without flashing everyone (or if you are like me, no one can tuck around the side of you so no one case see your back fat either!)Jack of all trades, Master of None
According to Wikipedia (the ultimate all-knowing source for everything) "Jack of all trades is a figure of speech used in reference to a generalist: a person that is competent with many skills but is not outstanding in any particular one...Today, the phrase used in its entirety generally describes a person whose knowledge, while covering a number of areas, is superficial in all of them." Well, that pretty much sums me up. I love to sew and quilt but I am not great at either. I love to cook but I am definitely not a master chef, in fact, I like recipes that are simple and easy and usually start with something from a box. I love to find find a good deal, but I normally find them off of someone else blog. I like to make crafts and decorate my home but I am no Martha Stewart. I love to scrapbook and make cards, however, the things I make are usually copied from a magazine. In fact, I like to do a little bit of everything and that is what this blog will have on it...a little bit of everything. A little bit of whatever I happen to be interested in at the moment. It's not a sewing blog, an interior design blog, a scrapbooking blog, a deals blog, a cooking blog, or even a crafting blog...It's an EVERYTHING blog because I am Merri-of-all-trades....or for short. you can just call me MOAT. So, dont be afraid of MOAT, there are no dragons in here, just a random bit of everything that I am enjoying at the moment (and I hope you will to).
Subscribe to:
Posts (Atom)